Home / Troubleshooting / TDR Meter Cable Tester
What is a TDR Meter and how do I use it?
TDR Meter Cable Tester
Using Your TDR Meter to Locate a Fault in Your Heating System
(Time Domain Reflectometer)
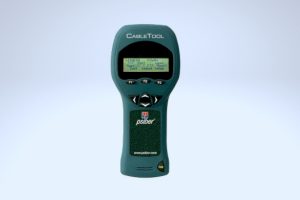
What It Does
The TDR Meter measures the distance to an existing fault in the wiring of your heating system.
How It Works
The TDR sends an electrical pulse into the connected cable, traveling along the cable until it reaches the fault and then that pulse is sent back to the TDR. The time it takes for that pulse to reach the fault and travel back is measured and converted to a distance reading that appears on the TDR Meter.
How to Use It
1. The meter is already set to the specifications required to locate the fault. All you need to do is press the power button to activate. Connect the included alligator clips to the meter following the color coding indicated (black to black, red to red).
2. Cut all electricity going to your thermostat and disconnect the heating system from the thermostat.
3. Press power on your TDR meter to begin.
4. First attach one clip to one of the lead wires of the heating system and connect the other clip to the ground wire (metal ground sheath of the heating cable). Press F1 (for length) and wait for the reading. Compare this number to the manufactured length of the wire indicated in the cable installation manual. You will now see how many feet it is to the break. Repeat this process but now get a reading from other lead wire.
5. IF THE READINGS ARE THE SAME: If the readings on both sides are the same and within 10% of the total length of the wire (see product specs or manual), you should be in good shape. It can however mean that your break is at the far end of the wire. The most common scenario is a damaged end splice (the tail of the wire).
If your readings are the same but significantly shorter than the factory length of the wire, it could indicate that you have a complete break. For example, on a 25 sqft mat (NADWM-120-350), the cable is 100ft and the mat is 15ft. If your TDR readings are well short of 100ft, then you may have a clean break in the wire.
Confirm your readings with an Ohm-Meter or Multi-Meter:
Black to White: see factory settings. Typically, on a 200 Ohms scale, you should read something between 20 and 200. If you have no readings here, it might indicate or confirm you have a break.
Before jumping to conclusions, double check the batteries on your reader and re-do the measure. Ensure to use a digital ohm-meter (digital screen), not an analog one (with a needle indicator).
Black to ground: no reading should show. If you do show a reading, it confirms a “leak to ground” and you have a “short”. The TDR should give you the distance on that leg and indicate “Short”.
White to ground: no reading should show. If you do show a reading, it confirms a “leak to ground” and you have a “short”. The TDR should give you the distance on that leg and indicate “Short”.
6. IF THE READINGS ARE DIFFERENT: If the readings on the black and white side are different, write down your readings. What happens here is that the wire is partially damaged, and the signal on one side hits the damage and the reading on the other side goes all the way to the end of the cable, and then hits the damage on the return.
In the example of the 25 sqft mat above, if partial damage is found 30ft away on the white side of the cable, then one reading will read 30ft and the other will read 170ft. That is 100ft to the end of the black side (no damage) and 70ft backward returning on the white side of the cable.
7. Once you have written down your readings and made a written map of the cable or mat layout the possible location is to carefully lift the tile over the suspected area. Be careful with grinders if you use them, and favor smaller tools and a slower process rather than the industrial-grade chisel and hammer approach. A smaller chisel will allow you to reduce further damage to the wire.
8. If things go well, you will find a break. You are looking either at a black/dark spot in the thin set where the cable burned out or, after uncovering and loosening the cable, a crushed spot on the cable. You can typically spot these with bare hands by running your fingers on the break. More often than not, this is not the spot where the break lies.
If the break is not here, cut the wire on purpose and carefully clean the ground and conductors on both sides. You will have one side heading to the thermostat and one side aiming to the tail of the mat. Let’s call them upstream (thermostat) and downstream (tail-end). When cleaning up the wires and exposing the copper, we recommend using a utility knife with a fresh blade. The wires are so small that most wire strippers will simply break the cable.
9. ISOLATE THE SIDE WITH THE BREAK: To identify whether the break is upstream or downstream from your cut, use your ohm-meter. Twist the black and white together at the thermostat with a wire nut (do not connect the ground wire). Check the ohm’s normally from your cut towards the thermostat.
You should have a reading (a fraction of the factory reading since you’re not measuring the entire cable), and an open circuit to ground. If that’s not the case, your break is on that side and you should repeat the TDR meter steps above to identify how far from your cut the break now is. IF your original drawing and approximation was good, you should read a small number of feet.
Assuming that your circuit is fine, turn to the other side of your cut and use the Ohm-meter to check readings towards the tail of the mat (downstream). In the case that the ohms do not show a complete circuit, repeat the TDR meter instructions above to get nearer to the break.
ONCE THE BREAK IS FOUND
When you have found the break, we suggest you first simply twist all the wires back together. This establishes a complete circuit from the thermostat. Measure the ohms to confirm you have restored the original or close to the original readings.
There is no polarity in the cable, which means that you can interchange the two conductors at any point. While the cables are color-coded at the thermostat level, they are all the same under the floor.
Follow the instructions located in the Warmup standard repair kit to complete your connections.
Related:
https://warmupedia.warmup.com/product/tdr-meter-cable-tester/

